Wheat is Kenya’s second most important cereal crop after maize, and its demand continues to outpace local supply by a wide margin. The country imports over 75% of the wheat it consumes — roughly 2 million metric tonnes every year — which means there is a massive and growing opportunity for Kenyan farmers who can produce quality grain efficiently. Whether you farm on the vast plains of Narok, the highlands of Nakuru, the fertile stretches of Uasin Gishu, or the slopes around Timau on Mount Kenya, this guide walks you through everything you need to know — from picking the right variety to selling your harvest at the best possible price.
Wheat provides the raw material for bread, chapati, pastries, biscuits, pasta, and countless other staple products that Kenyans consume daily. In fact, consumption of wheat-based foods has now overtaken maize in many parts of the country. That growing demand, combined with a persistent production gap, makes wheat farming one of the most promising agribusiness ventures available today.
If you are also exploring other crops alongside wheat — whether for rotation or diversification — have a look at our guides on growing maize in Kenya, growing potatoes in Kenya, or growing beans in Kenya. All three make excellent rotation partners for wheat.
Choosing the right wheat varieties for Kenyan conditions
Selecting the right variety is the single most important decision you will make. A variety that matches your altitude, rainfall pattern, and soil type will outperform one that does not — no matter how much fertiliser or labour you throw at it. Kenya’s wheat breeding programme has produced dozens of varieties over the past eight decades, so there is almost certainly one that fits your particular farm.
High-yielding wheat varieties recommended by KALRO
Kenya’s Agricultural and Livestock Research Organization (KALRO), based at the Njoro Food Crops Research Centre, has been breeding wheat varieties for over 85 years. According to the KEPHIS national variety list, 45 registered wheat varieties are available in Kenya. The most recent and highest-performing releases include:
- Kenya Kasuku — a medium-maturing variety (110–120 days) released in 2019. Under good management, Kasuku can yield 7–8 tonnes per hectare, making it one of the top performers currently available.
- Kenya Hornbill — tolerant to acidic soils, which is a significant advantage in parts of the Rift Valley where pH can be an issue. It performs best at altitudes of 1,800–2,100 m (areas like Njoro, Rongai, Endebees, and Moiben) and yields approximately 7.5 t/ha.
- Kenya Deer — a fast-maturing variety (100–110 days) suited for lower-altitude wheat zones below 1,800 m, such as lower Narok, Lanet, and Naivasha. Its yield potential is an impressive 7.8 t/ha, and it carries strong resistance to both stem rust and yellow rust.
- Duma and Ngamia — developed specifically for dry areas with low rainfall and short growing periods, such as lower Narok, Kajiado, Naivasha, Mogotio, and Machakos. Both varieties mature early and carry good rust resistance. They can yield up to 9 bags per acre under proper management.
Older but still widely planted varieties include Robin, Kwale, Eagle 10, Hawk, and Korongo. Robin remains the most popular wheat variety in Kenya, particularly in the North Rift, thanks to its consistency across a range of environments. Kwale is the variety of choice in Timau, valued for its strong milling quality and good Septoria resistance. Hawk is notable for its earlier maturity and excellent stem rust resistance, while Korongo produces a sought-after white grain that millers actively look for (Agcenture, Cropnuts).
Matching wheat varieties to Kenya’s agro-ecological zones
Kenya’s wheat belt spans a wide range of altitudes, rainfall amounts, and temperature profiles. Getting the variety-to-zone match right is critical for maximising yields and reducing risk:
- Highland zones (1,800–2,400 m) — areas like Njoro, Molo, Moiben, upper Narok, Timau, and Oljororok. These zones receive reliable rainfall and have cool temperatures ideal for wheat. Varieties like Kasuku, Hornbill, Kwale, and Korongo thrive here. However, the cooler, wetter conditions also increase disease pressure from Septoria and yellow rust, so choose varieties with strong disease packages or plan for robust fungicide programmes.
- Mid-altitude zones (1,500–1,800 m) — areas like Naivasha, lower Narok, Lanet, and parts of Nakuru. These zones tend to be warmer and drier. Early-maturing varieties like Kenya Deer, Duma, and Ngamia perform well because they can complete their growth cycle before moisture runs out.
- Drier, marginal areas — locations like Kajiado, Mogotio, and parts of Machakos that receive lower and less predictable rainfall. Focus on drought-tolerant varieties with the shortest growing periods. Supplementary irrigation, even if limited, can significantly boost yields in these zones.
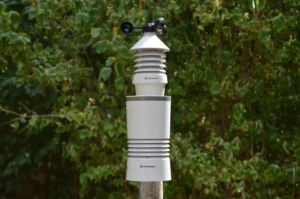
Understanding the micro-climate on your specific farm — not just the broad regional average — is what separates good farmers from great ones. A weather station from NuaSense measuring air temperature, humidity, rainfall, wind direction and strength, air pressure, and sunlight hours gives you the localised data to confidently match a variety to your conditions. When you combine that weather data with soil sensor readings of soil moisture and soil temperature, you build a complete picture of your farm’s growing environment before you even plant a single seed.

Where to source certified wheat seeds in Kenya
Always use certified seed. This cannot be overstated. Certified wheat seed is free from weed seeds such as wild oats, Setaria, rye grass, and Beckeropsis. It has sound kernels with high germination rates, and it is composed of a single variety, which ensures even ripening across your entire field. Farmers delivering wheat that contains a mix of two or more varieties, or immature kernels mixed with mature seed, will be penalised with lower grading and lower prices at the market.
You can source certified wheat seed from KALRO Njoro, Kenya Seed Company, and licensed agro-dealers across wheat-growing counties. Avoid the temptation of recycling grain from a previous harvest as seed — it may be contaminated with weed seed, harbour disease, or be a mixture of varieties that will cause uneven ripening and market penalties (Infonet Biovision).
Preparing your land and planting wheat
Good preparation lays the foundation for a strong, uniform crop. Cutting corners at this stage — whether in soil preparation, nutrient management, or planting technique — will cost you throughout the season and show up as lower yields at harvest.
Soil testing and nutrient requirements for wheat
Wheat demands fertile soils that are rich in nitrogen, phosphorus, and potassium. Kenyan soils are often deficient in sulphur and copper, both of which are critically important for wheat grain development. In fact, copper deficiency is widespread across key wheat-growing areas including Njoro, Rongai, Menengai, Lanet, Naivasha, Gilgil, and the whole of Narok district. Copper-deficient wheat shows poor growth and tip burn. The recommended treatment is to dress seed with copper oxychloride (1 kg per 100 kg of seed) and apply a foliar spray of 1 kg/ha at early tillering.
Before planting, get your soil tested at a certified lab to determine pH levels and nutrient content. Wheat grows best in soils with a pH between 5.5 and 7.5. If your soil is too acidic, consider liming. If it is too alkaline, gypsum application may help. The soil test results will tell you exactly what nutrients to apply and at what rates, rather than applying blanket recommendations that may waste money or leave deficiencies unaddressed.
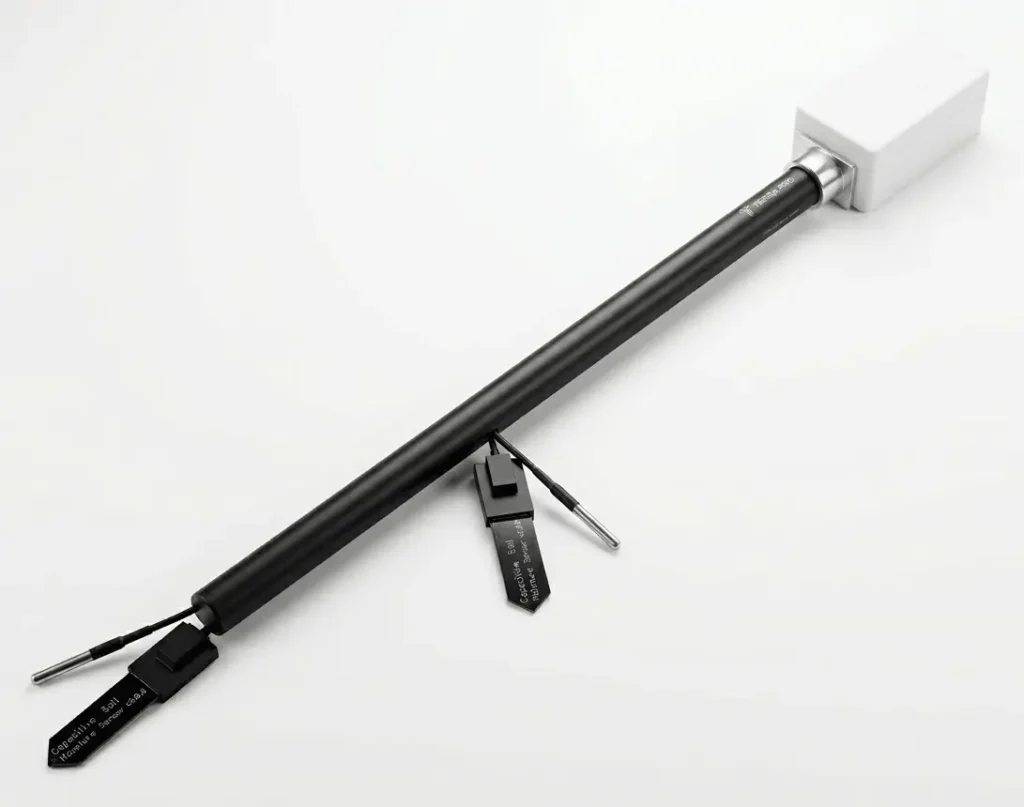
A soil sensor from NuaSense placed in your field gives you continuous readings of soil moisture and soil temperature throughout the season. Soil temperature data is particularly useful at planting time — wheat germinates best when soil temperatures are within the 10–24°C range. If the soil is too cold or too hot, germination will be poor and patchy regardless of how well you prepared the seedbed. Continuous soil moisture data also tells you whether your field has adequate moisture to support germination or whether you should delay planting by a few days until the next rainfall.
Optimal planting seasons and rainfall patterns
Wheat in Kenya is planted during the long rains (March to April) and, in some regions, during the short rains (October to November). The crop needs roughly 500–800 mm of rainfall spread across its growing season, which typically lasts 100–120 days depending on the variety.
Timing your planting is everything. Planting too late means the crop will face moisture stress during grain filling — the most water-demanding stage of wheat growth — which directly reduces yield. Planting too early into unreliable rains risks poor germination and an uneven stand. The sweet spot is to plant within the first two weeks of established rains, when the top 10–15 cm of soil is sufficiently moist.
Wheat is a relatively low water-use crop compared to maize, but it is very sensitive to waterlogging, especially in the early growth stages. Unlike rice, wheat cannot tolerate standing water. The three most critical water-demanding periods are: (a) right after planting for germination and establishment, (b) at the tillering stage when the plant is building its canopy, and (c) at flowering and grain fill when up to 70% of the crop’s total water need is consumed.
A farm-level weather station tracking daily rainfall, humidity, temperature, and wind patterns helps you decide the optimal planting window for your specific location. Rather than relying on regional forecasts that may not reflect what is happening on your farm, you make decisions based on actual measured data. If rainfall is patchy in your area, consider supplementary irrigation using sprinkler or furrow systems during critical growth stages. For more on using sensor data to optimise water delivery, read our guide on smart irrigation in Kenya.
If you also grow herbs or vegetables between wheat seasons — a common practice among diversified farmers — our guide on growing herbs in Kenya covers rotation-friendly options that complement a wheat farming system.
Seed rate, spacing, and planting methods
There are two main planting methods used in Kenyan wheat farming, and the choice between them affects everything from seed rate to weed pressure to final yield.
Drill planting is the preferred method for most commercial wheat farms. A seed drill places seeds at a uniform depth of 3–5 cm with row spacing of 20–25 cm. This ensures even seed distribution, consistent depth, and efficient use of both seed and fertiliser. Recommended seed rates when using a drill planter vary by variety: 75 kg/ha for varieties like Kenya Nyangumi, Kenya Bongo, and Kenya Tembo, and 100 kg/ha for varieties like Robin, Kwale, Leopard, and Bounty. The target is to achieve a plant population of roughly 250–300 plants per square metre.
Broadcasting is simpler and requires less equipment, but it is less efficient and gives less uniform results. If broadcasting, increase your seed rate to about 1.5 bags (75 kg) per acre to compensate for uneven distribution. Mix your seed with DAP fertiliser and cover with a light harrowing pass to ensure good soil-to-seed contact. Broadcasting tends to produce a less uniform crop, which can lead to uneven ripening and more weed competition between plants.
In dry conditions, you may need to plant deeper — up to 10–12 cm — to reach soil moisture. However, be careful not to sow too deep, as the seedling may not have enough energy to emerge. This is a judgement call that depends on your specific soil type and moisture profile. Sandy soils drain faster and may require deeper planting, while clay soils retain moisture closer to the surface.
Regardless of method, start with a fine, weed-free seedbed. Plough to at least 15 cm depth, then harrow to break clods and create a smooth, even surface. Any weeds present at planting will compete aggressively with young wheat seedlings. A non-selective herbicide applied during land preparation can give your crop a clean start (CKL Africa).
Crop management and protection
Once your wheat is in the ground, active management through the growing season determines whether you harvest 3 tonnes or 8 tonnes per hectare. This section covers the three pillars of in-season management: nutrition, weed control, and pest and disease management.
Fertiliser application and top-dressing schedules
Wheat is a hungry crop, and getting the fertiliser programme right has a direct impact on both yield and grain quality.
At planting, apply DAP (Di-Ammonium Phosphate) at 200–250 kg per hectare to provide a strong phosphorus and nitrogen base for early root and shoot development. If you are broadcasting, use roughly 1.5 bags of DAP per acre mixed with seed. Some farmers also incorporate farmyard manure at 12 wheelbarrows per acre where available, which improves soil structure and provides slow-release nutrients throughout the season.
Nitrogen top-dressing is essential and should not be skipped. The crop’s nitrogen demand peaks during three key stages: tillering (weeks 3–5 after emergence), stem extension (weeks 6–8), and ear emergence (weeks 9–10). CAN (Calcium Ammonium Nitrate) is the most commonly used top-dressing fertiliser, typically applied at 100–150 kg/ha. Some agronomists recommend splitting the top-dress into two applications — one at tillering and another at stem extension — to match the crop’s uptake pattern more closely and reduce the risk of nitrogen losses through leaching.
Foliar feeds containing nitrogen, sulphur, and copper applied during ear emergence can further boost grain fill and quality. This is particularly important in the copper-deficient soils found across much of the Kenyan wheat belt. Products that combine foliar nutrition with fungicide protection offer a cost-effective way to address both nutrition and disease in a single pass.
Here is where technology makes a real difference in your bottom line. NuaSense soil sensors track soil moisture in real time, telling you when the soil has enough moisture to dissolve and carry nutrients to the root zone. Applying CAN top-dressing into dry soil is essentially wasted money — the fertiliser granules sit on the surface until rain arrives, during which time some nitrogen may be lost to volatilisation. Data from your sensor tells you the ideal application window, so every kilogram of fertiliser you apply works harder. Over a full season, this kind of precision can save significant money on inputs while actually improving yields. For a deeper look at how smart sensors optimise input use, read our guide on smart irrigation in Kenya.
Weed control strategies for Kenyan wheat fields
Weeds are one of the most serious threats to a young wheat crop. They compete aggressively for light, water, nutrients, and space, and if left unchecked for even a few weeks after emergence, they can strangle the crop and cause devastating yield losses. A comprehensive weed management plan combines prevention, cultural practices, and chemical control.
Prevention starts with clean land preparation. Plough and harrow thoroughly before planting to destroy existing weeds and expose weed seeds to drying. A stale seedbed technique — where you prepare the field, wait for a flush of weeds, then kill them with a light cultivation or non-selective herbicide before planting — can dramatically reduce early-season weed pressure.
Crop rotation is your long-term weed management tool. Alternating wheat with non-cereal crops like beans, potatoes, or other legumes breaks the weed cycle and reduces the weed seed bank in the soil over successive seasons. Many grass weeds that thrive in continuous wheat are easily controlled in a broadleaf rotation crop, and vice versa. If you are planning your rotation, our guides on growing beans in Kenya and growing potatoes in Kenya offer useful companion reading.
Herbicide application is the primary in-season tool for weed control in wheat. Common products used in Kenya include 2,4-D Amine for broadleaf weeds, Buctril MC applied at a rate of 150 ml per knapsack per acre, and Granstar or Glean for more targeted control. Apply herbicides when the crop has 4–6 leaves and weeds are still small and actively growing. Timing matters more than product choice — spraying before weeds reach the tillering stage is far more effective than trying to control large, established weeds later.
Scout your fields weekly from emergence through to canopy closure. Walk a zigzag pattern across the field and note which weed species are present and at what density. Early scouting allows you to catch problems before they escalate and to make targeted herbicide decisions rather than blanket applications, which saves money and reduces environmental impact.
Managing common wheat pests and diseases
Wheat in Kenya faces several serious pests and diseases that, if left unmanaged, can reduce yields by 50% or more in severe cases. Understanding what to look for and when to act is the key to keeping losses to a minimum.
Stem rust and yellow rust are the most damaging fungal diseases in Kenyan wheat. Stem rust attacks stems, leaves, and heads, producing reddish-brown pustules that rupture the plant surface. Yellow rust appears as yellow-orange stripes along the leaves, mainly in cool, wet highland conditions. Both diseases can devastate a crop within days under favourable conditions. Your first line of defence is planting resistant varieties — Hawk, Korongo, Duma, Deer, and Hornbill all carry strong rust resistance. Follow up with preventive fungicide sprays at flag leaf and ear emergence, which is when the crop is most susceptible. If rust appears during wet weather, repeat the spray after 7–10 days and rotate fungicide classes to prevent resistance build-up.
Septoria leaf blotch is particularly problematic in cool, wet highland areas like Timau and Eldoret. Symptoms include irregular brown lesions on leaves that reduce the plant’s photosynthetic area. Varieties like Robin are especially vulnerable and benefit from SDHI-based fungicides. Good field hygiene — removing crop residue from the previous season — also reduces the source of infection.
Head smut has been largely controlled through breeding of resistant varieties, but it can still appear if you use uncertified seed. Always plant certified, disease-free seed to keep smut out of your fields.
Russian wheat aphid and armyworms are the two most economically important insect pests. Aphids suck sap from leaves and stems, causing stunted growth, yellowing, and leaf curling. Left unchecked, a heavy aphid infestation can reduce yields significantly. Insecticides like Imidacloprid, Thiamethoxam, or Acetamiprid are effective. Natural predators such as ladybirds and lacewings also provide biological control and should be encouraged by avoiding unnecessary broad-spectrum sprays. Armyworms are the larvae of moths that feed voraciously on leaves, stems, and heads. Lambda-cyhalothrin and Chlorpyrifos are commonly used to control outbreaks, but cultural practices like timely planting and crop rotation also help reduce armyworm populations over time.
Early detection is the key to keeping both pest and disease damage to a minimum. The NuaSense smart sensor platform helps by monitoring the environmental conditions — temperature, humidity, rainfall, and wind patterns — that signal when disease or pest pressure is likely to spike. For example, warm temperatures combined with high humidity and leaf wetness create the perfect conditions for a rust outbreak. Instead of spraying on a fixed calendar regardless of conditions, you spray when the data tells you the risk is genuinely high. This saves money on unnecessary applications and reduces chemical use, which is better for both your budget and the environment. For more on identifying and managing specific crop threats, check our detailed guide on crop pests and diseases in Kenya.

Harvesting, post-harvest handling, and marketing
All the effort of the growing season comes down to the harvest and what happens immediately after it. Getting these final steps right protects your margins and ensures you capture the full value of what you have grown.
Signs of maturity and harvesting techniques
Wheat is ready for harvest when several clear signs converge: the crop has turned golden-brown, the stems and leaves are dry, and the grain kernels are hard enough that they cannot be dented or crushed with a fingernail. At this stage, grain moisture content should be at or below 13–14%. Testing moisture with a handheld moisture meter before you begin harvesting is a worthwhile investment — it takes the guesswork out of the decision.
Do not delay harvesting once the crop is mature. Every day that ripe wheat stands in the field exposes it to risk: rain can wet the grain and cause sprouting in the head, wind can shatter ripe kernels from the ear, and birds can cause significant losses. In areas like Narok that often receive late-season rainfall, timing the harvest precisely is especially important.
Most commercial wheat in Kenya is harvested using combine harvesters, which cut, thresh, and clean the grain in a single pass. If you do not own a combine, contracting one is common practice in wheat-growing areas. Make sure the combine is properly calibrated for your crop — incorrect settings cause cracked grain, excessive losses, or incomplete threshing.
Smallholder farmers who cannot access a combine may cut manually using sickles and thresh with a stationary thresher or by spreading sheaves on a clean, hard surface and beating them. While more labour-intensive, this approach can still produce good results if done carefully and promptly. The key is to minimise the time between cutting and threshing, as cut wheat lying in the field is vulnerable to moisture uptake and spoilage.
Drying, threshing, and storage best practices
One of the biggest post-harvest challenges in Kenyan wheat farming is high moisture content at harvest, especially when rains arrive during or just before the harvesting period. This is a common problem in the Rift Valley, where harvesting overlaps with unpredictable rainfall. Grain that goes into storage above 13% moisture will develop mould, mycotoxin contamination (including aflatoxins), and insect infestations — all of which reduce quality, lower your grade at market, and in severe cases render the grain unfit for human consumption.
Dry your grain to below 13% moisture before storage. There are several ways to do this:
- Sun-drying on clean tarpaulins or concrete floors is the most common and cheapest method. Spread the grain in thin layers (no more than 10 cm deep) and turn it regularly throughout the day. This works well in dry weather but is unreliable when rains persist.
- Mechanical drying using heated-air driers is faster and more reliable. NCPB operates both fixed and mobile driers at their silos in Narok, Nakuru, Nairobi, Eldoret, Kitale, Kilgoris, Kisumu, Moi’s Bridge, and Bungoma. Farmers can bring grain to the nearest silo or request a mobile drying unit to come to their location.
- Cooperative drying — farmers in the same area can aggregate their wheat and dry it collectively, which makes the per-unit cost of mechanical drying more affordable.
For storage, use clean, dry, and well-ventilated facilities. Hermetic (airtight) storage bags are an affordable and highly effective option for smaller farmers, as they kill insects through oxygen depletion without needing any chemicals. Larger farms may use steel silos or NCPB’s warehousing facilities, which include the Warehouse Receipt System (WRS). Under WRS, NCPB stores your grain and can also market it on your behalf.
Kenya loses roughly 30% of its grain harvest annually due to poor post-harvest management, according to the National Cereals and Produce Board. This is a staggering figure that represents billions of shillings in lost farmer income every year. Getting drying and storage right is not an optional extra — it is a direct and significant contribution to your farm’s profitability (Kenya News Agency).
Selling your wheat – markets, pricing, and NCPB options
Kenya’s wheat market offers several routes for selling your harvest, and the route you choose can significantly affect the price you receive and how quickly you get paid.
NCPB (National Cereals and Produce Board) is the government body mandated to buy wheat from farmers, manage the strategic grain reserve, and stabilise market prices. NCPB buys wheat at a set price and offers storage through its conventional stores and Warehouse Receipt System (WRS). Farmers using NCPB storage benefit from professional drying, cleaning, grading, and weighing services. However, NCPB has faced payment delays in the past, so it is worth checking the current payment timeline before committing large volumes.
Private millers and traders — companies like Unga Group, Pembe Flour Mills, and other members of the Cereal Millers Association (CMA) — buy directly from farmers and cooperatives. The CMA has an agreement with the government to purchase all locally produced wheat before being permitted to import, which should help support domestic prices. Building a direct relationship with a miller can give you a faster and sometimes better payout than selling through NCPB.
Cooperative societies — joining a cooperative gives you more bargaining power when negotiating with millers, access to bulk discounts on inputs like seed and fertiliser, and shared infrastructure such as drying facilities and transport. For smallholder farmers, cooperatives are often the most effective way to access premium markets.
Contract farming is another option worth exploring. Under a contract arrangement, a buyer commits to purchasing your wheat at a pre-agreed price before you even plant. This eliminates price uncertainty and allows you to plan your season with confidence, knowing your offtake is secured. Some millers and aggregators in the Rift Valley offer these arrangements.
Typical wheat prices range from KSh 5,100 to 5,200 per 90 kg bag for Grade 1 and Grade 2 wheat, though prices fluctuate seasonally and are influenced by global import prices, the Kenya-shilling exchange rate, and local supply dynamics. An acre of well-managed wheat in Kenya yields between 1.5 and 3 tonnes, which at current prices translates to potential earnings of KSh 45,000 to KSh 120,000 per acre — a solid return for a crop that takes only 100–120 days from planting to harvest.
The most important marketing advice is simple: build relationships with buyers before your harvest comes in. Do not wait until the wheat is in bags to start looking for a buyer. Early engagement gives you the leverage to negotiate better terms and ensures you have a confirmed offtake ready the moment the combine finishes its last pass.
Final Thoughts
Growing wheat in Kenya is challenging, but it is also deeply rewarding. The persistent gap between local production and national demand means the market is there for farmers who can produce quality grain efficiently and consistently. Success comes down to five things: choosing the right variety for your zone, preparing your soil properly, managing your crop actively through the season, handling post-harvest with discipline, and marketing your grain strategically.
Increasingly, Kenyan wheat farmers are turning to precision agriculture tools to make smarter, data-driven decisions at every stage. Platforms like NuaSense bring together soil sensors and weather stations to give you real-time, field-level data — from the moment you decide when to plant, through irrigation and fertiliser timing, to disease risk monitoring and harvest readiness. When you know exactly what is happening on your farm at every moment, every decision you make is better informed and every input you apply works harder.
The opportunity is real. The tools are available. The rest is up to you.
Good luck with your wheat season.